SpringBoot集成swagger-ui以及swagger分組顯示操作
大家好,這篇文章展示下如何在springboot項(xiàng)目中集成swagger-ui。有人說(shuō),這都是老生常談,網(wǎng)上的例子數(shù)不勝數(shù)。確實(shí)swagger誕生至今已經(jīng)很久了,但是在使用過(guò)程中我遇到一個(gè)問(wèn)題,下面給大家分享下我的使用心得吧。
1.swagger配置類
第一步,需要在pom中引入相應(yīng)的配置,這里使用2.7.0的版本。需要注意的是2.7.0和2.8.0的版本在界面風(fēng)格上差異很大,如果感興趣,可以試試2.8.0以上的版本,我比較青睞使用2.7.0及以下的版本,因?yàn)榻缑姹容^清爽。
第一步 引入pom
<!--swagger--><dependency> <groupId>io.springfox</groupId> <artifactId>springfox-swagger2</artifactId> <version>2.7.0</version></dependency><dependency> <groupId>io.springfox</groupId> <artifactId>springfox-swagger-ui</artifactId> <version>2.7.0</version></dependency>
第二步
在代碼中加入相應(yīng)的配置,新建config包,寫(xiě)入swaggerConfig配置類:
import org.springframework.context.annotation.Bean;import org.springframework.context.annotation.Configuration;import springfox.documentation.builders.ApiInfoBuilder;import springfox.documentation.builders.PathSelectors;import springfox.documentation.builders.RequestHandlerSelectors;import springfox.documentation.service.ApiInfo;import springfox.documentation.service.Contact;import springfox.documentation.spi.DocumentationType;import springfox.documentation.spring.web.plugins.Docket;import springfox.documentation.swagger2.annotations.EnableSwagger2;@Configuration@EnableSwagger2public class SwaggerConfig { /** * 創(chuàng)建API應(yīng)用 * apiInfo() 增加API相關(guān)信息 * 通過(guò)select()函數(shù)返回一個(gè)ApiSelectorBuilder實(shí)例,用來(lái)控制哪些接口暴露給Swagger來(lái)展現(xiàn), * 本例采用指定掃描的包路徑來(lái)定義指定要建立API的目錄。 * * @return */ @Bean public Docket restApi() { return new Docket(DocumentationType.SWAGGER_2) .groupName('標(biāo)準(zhǔn)接口') .apiInfo(apiInfo('Spring Boot中使用Swagger2構(gòu)建RESTful APIs', '1.0')) .useDefaultResponseMessages(true) .forCodeGeneration(false) .select() .apis(RequestHandlerSelectors.basePackage('com.xqnode.learning.controller')) .paths(PathSelectors.any()) .build(); } /** * 創(chuàng)建該API的基本信息(這些基本信息會(huì)展現(xiàn)在文檔頁(yè)面中) * 訪問(wèn)地址:http://ip:port/swagger-ui.html * * @return */ private ApiInfo apiInfo(String title, String version) { return new ApiInfoBuilder() .title(title) .description('更多請(qǐng)關(guān)注: https://jb51.net') .termsOfServiceUrl('https://jb51.net') .contact(new Contact('xqnode', 'https://jb51.net', 'xiaqingweb@163.com')) .version(version) .build(); }}
.apis(RequestHandlerSelectors.basePackage(“com.xqnode.learning.controller”))這個(gè)配置是用來(lái)指定我們的接口層的位置,大家可以根據(jù)你自己項(xiàng)目的實(shí)際情況來(lái)進(jìn)行修改。.apiInfo()是定義一些我們項(xiàng)目的描述信息,可以根據(jù)實(shí)際需要在參數(shù)中修改。需要注意的是配置類的頭部需要加上@Configuration,聲明配置類,以及@EnableSwagger2加載swagger的一些相關(guān)配置。
2.使用swagger
我們?cè)趧偛胖付ǖ慕涌趯邮褂胹wagger來(lái)說(shuō)明接口的使用方法。
import com.fasterxml.jackson.databind.ObjectMapper;import io.swagger.annotations.Api;import io.swagger.annotations.ApiOperation;import io.swagger.annotations.ApiParam;import org.springframework.web.bind.annotation.PostMapping;import org.springframework.web.bind.annotation.RequestBody;import org.springframework.web.bind.annotation.RequestMapping;import org.springframework.web.bind.annotation.RestController;import javax.annotation.Resource;import java.io.IOException;import java.util.Map;@RestController@RequestMapping('/api')@Api(tags = '標(biāo)準(zhǔn)演示接口')public class ApiController { @Resource private ObjectMapper mapper; @PostMapping('/ps') @ApiOperation(value = '接受json參數(shù)', notes = '演示json參數(shù)是否接受成功') public String post(@ApiParam(name = '接收json參數(shù)', defaultValue = '{}') @RequestBody String json) throws IOException { Map map = mapper.readValue(json, Map.class); System.out.println(map); return json; }}
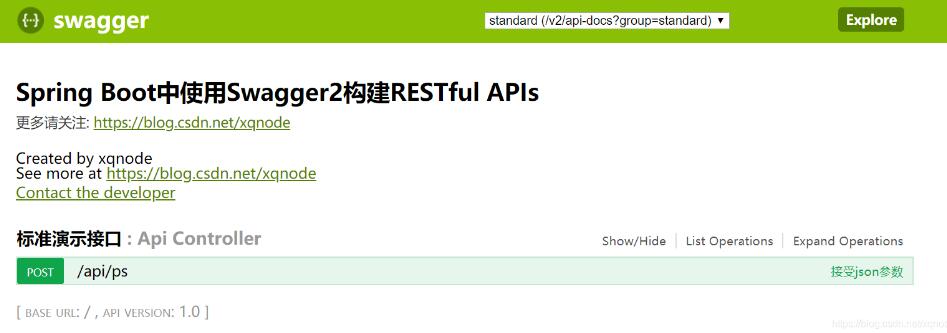
然后我們啟動(dòng)項(xiàng)目,打開(kāi)http://ip:port/swagger-ui.html:
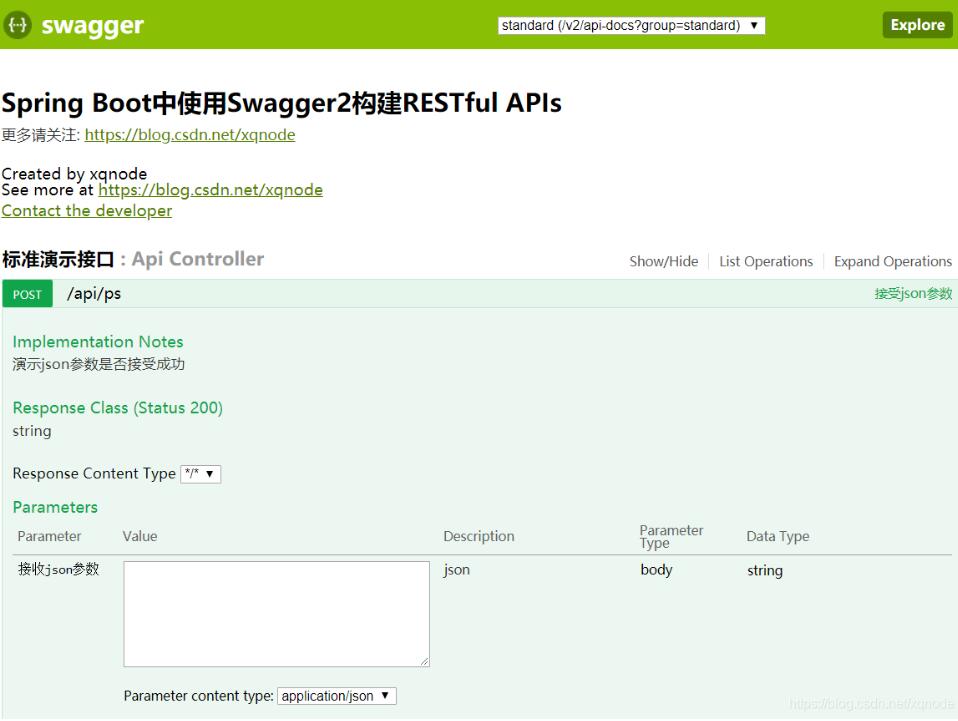
不輸入任何參數(shù),點(diǎn)擊try it out!按鈕:
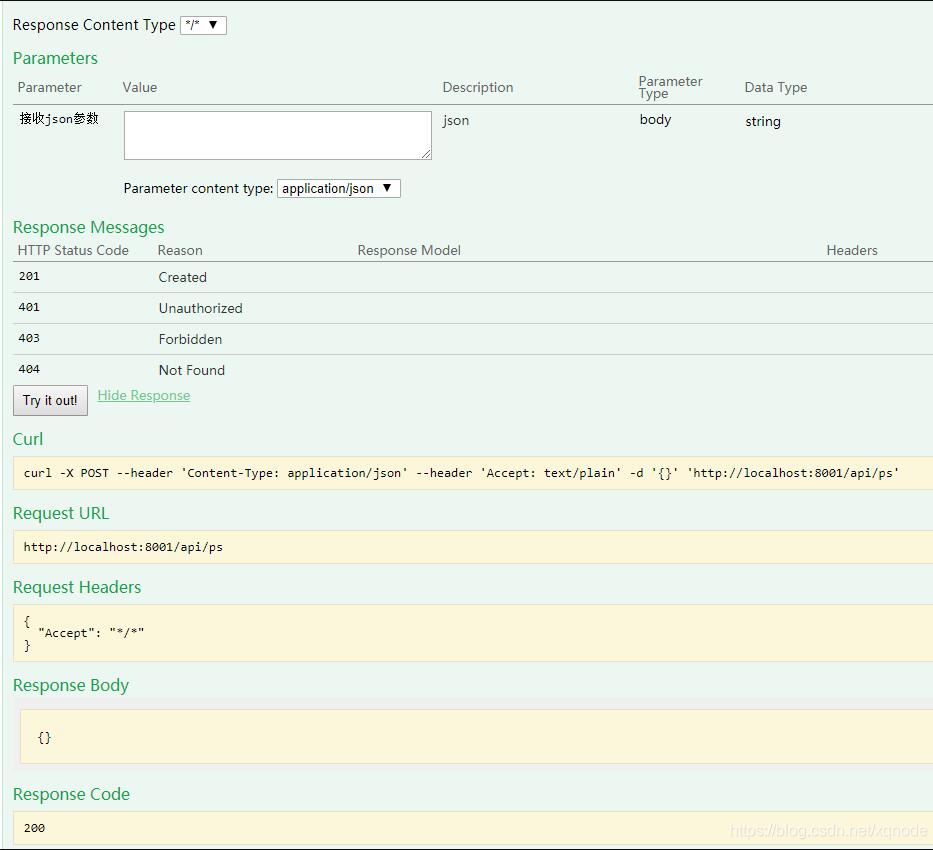
從頁(yè)面上我們可以看到我們?cè)诮涌诘念^部指定的接口類描述(@Api),以及在接口方法上指定的方法描述(@ApiOperation),在接口參數(shù)上指定的參數(shù)描述(@ApiParam)都已經(jīng)生效,這都是基于swagger來(lái)實(shí)現(xiàn)的,但是需要注意的是swagger只能提供接口的描述信息。
3.額外的學(xué)習(xí)經(jīng)歷
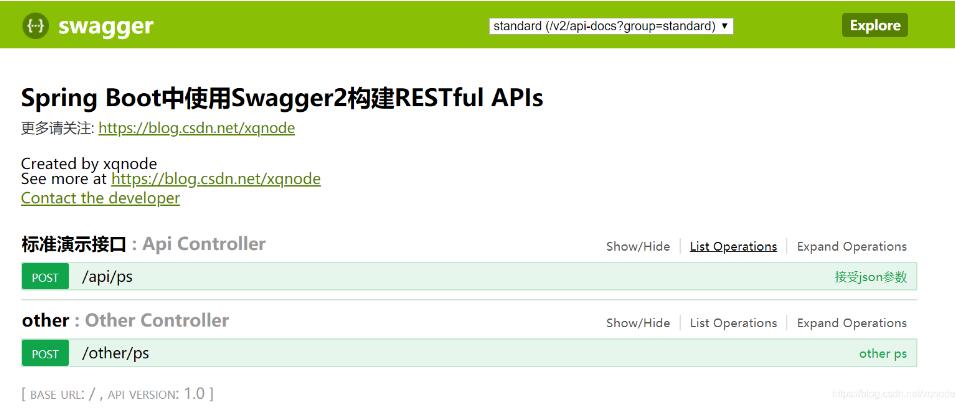
我在使用swagger的時(shí)候,遇到一個(gè)需求是這樣的,我需要在兩個(gè)接口層都使用swagger,即將兩個(gè)接口層的api分組展示,例如下面這兩個(gè)接口層:
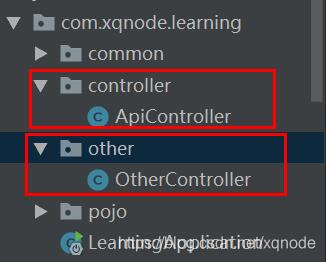
我啟動(dòng)項(xiàng)目后訪問(wèn)swagger頁(yè)面,發(fā)現(xiàn)一個(gè)很奇怪的問(wèn)題,就是other層的接口看不到:
我猜測(cè)原因可能是我在配置類中指定的接口層位置影響了swagger api的顯示。于是我百度了一下,找到一個(gè)解決方案,就是不指定接口層的位置,而指定注解的@RestController
@Bean public Docket restApi() { return new Docket(DocumentationType.SWAGGER_2) .groupName('standard') .apiInfo(apiInfo('Spring Boot中使用Swagger2構(gòu)建RESTful APIs', '1.0')) .useDefaultResponseMessages(true) .forCodeGeneration(false) .select()// .apis(RequestHandlerSelectors.basePackage('com.xqnode.learning.controller')) .apis(RequestHandlerSelectors.withClassAnnotation(RestController.class)) .paths(PathSelectors.any()) .build(); }
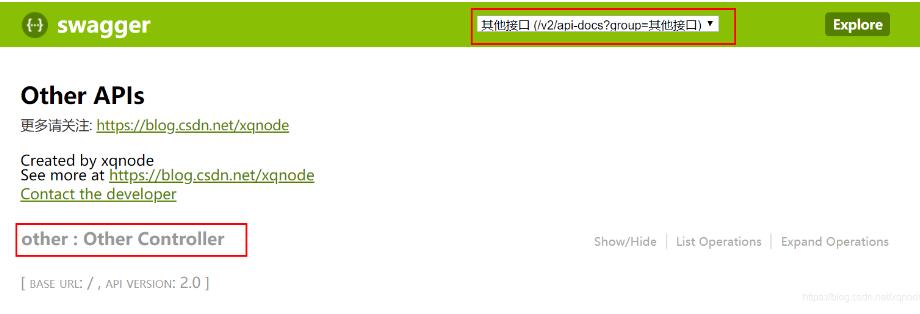
swagger界面中出現(xiàn)了另一個(gè)接口的api:
但是這樣的效果并不好。大家試想一下,我們?yōu)槭裁匆獙?duì)接口分層呢?不就是為了將業(yè)務(wù)隔離么,這樣在一個(gè)界面中出現(xiàn)兩個(gè)接口層的api,對(duì)于我們查找接口非常的不方便,也打亂了我們對(duì)接口分層的目的。那么怎么才能將其進(jìn)行隔離開(kāi)呢?
其實(shí)很簡(jiǎn)單,我們只需要重新定義一個(gè)Docket的bean,在其中指定另外接口層的位置即可:
@Bean public Docket restApi2() { return new Docket(DocumentationType.SWAGGER_2) .groupName('其他接口') .apiInfo(apiInfo('Other APIs', '2.0')) .select() .apis(RequestHandlerSelectors.basePackage('com.xqnode.learning.other')) .paths(PathSelectors.regex('/other.*')) .build(); }
我們?cè)谶@里指定了第二個(gè)接口層的位置,同時(shí)指定了它的路徑前綴,這樣我們?cè)趕wagger頁(yè)面中就能很方便很清晰的找到它里面的接口了。
接口層1:標(biāo)準(zhǔn)接口

接口層2:其他接口
現(xiàn)在我們只要通過(guò)切換分組,就可以找到我們關(guān)注的接口層的api了。
下面貼出完整的配置類:
@Configuration@EnableSwagger2public class SwaggerConfig { /** * 創(chuàng)建API應(yīng)用 * apiInfo() 增加API相關(guān)信息 * 通過(guò)select()函數(shù)返回一個(gè)ApiSelectorBuilder實(shí)例,用來(lái)控制哪些接口暴露給Swagger來(lái)展現(xiàn), * 本例采用指定掃描的包路徑來(lái)定義指定要建立API的目錄。 * * @return */ @Bean public Docket restApi() { return new Docket(DocumentationType.SWAGGER_2) .groupName('standard') .apiInfo(apiInfo('Spring Boot中使用Swagger2構(gòu)建RESTful APIs', '1.0')) .useDefaultResponseMessages(true) .forCodeGeneration(false) .select() .apis(RequestHandlerSelectors.basePackage('com.xqnode.learning.controller'))// .apis(RequestHandlerSelectors.withClassAnnotation(RestController.class)) .paths(PathSelectors.regex('/api.*')) .build(); } @Bean public Docket restApi2() { return new Docket(DocumentationType.SWAGGER_2) .groupName('其他接口') .apiInfo(apiInfo('Other APIs', '2.0')) .select() .apis(RequestHandlerSelectors.basePackage('com.xqnode.learning.other')) .paths(PathSelectors.regex('/other.*')) .build(); } /** * 創(chuàng)建該API的基本信息(這些基本信息會(huì)展現(xiàn)在文檔頁(yè)面中) * 訪問(wèn)地址:http://ip:port/swagger-ui.html * * @return */ private ApiInfo apiInfo(String title, String version) { return new ApiInfoBuilder() .title(title) .description('更多請(qǐng)關(guān)注: https://jb51.net') .termsOfServiceUrl('https://jb51.net') .contact(new Contact('xqnode', 'https://jb51.net', 'xiaqingweb@163.com')) .version(version) .build(); }}
至此,springboot集成swagger2完成,同時(shí)加了一個(gè)餐,還滿意吧?哈哈
以上這篇SpringBoot集成swagger-ui以及swagger分組顯示操作就是小編分享給大家的全部?jī)?nèi)容了,希望能給大家一個(gè)參考,也希望大家多多支持好吧啦網(wǎng)。
相關(guān)文章:
1. 使用Python webdriver圖書(shū)館搶座自動(dòng)預(yù)約的正確方法2. Python3 json模塊之編碼解碼方法講解3. 在線php代碼縮進(jìn)、代碼美化工具:PHP Formatter4. Android 簡(jiǎn)單的實(shí)現(xiàn)滑塊拼圖驗(yàn)證碼功能5. Android Studio實(shí)現(xiàn)格式化XML代碼順序6. 淺談?dòng)蓀osition屬性引申的css進(jìn)階討論7. PHP如何開(kāi)啟Opcache功能提升程序處理效率8. Python 合并拼接字符串的方法9. ASP.NET MVC使用jQuery ui的progressbar實(shí)現(xiàn)進(jìn)度條10. Linux刪除系統(tǒng)自帶版本Python過(guò)程詳解

 網(wǎng)公網(wǎng)安備